Most kitchen frustrations aren’t about the appliances—they’re about where the outlets aren’t. You reach for the toaster only to stretch a cord across the counter.

The coffee maker trips a breaker because it shares a circuit with the microwave. These are fixable problems, and the fix starts with a better kitchen electrical layout.

A well-planned electrical layout doesn’t just make cooking easier. It makes your kitchen safer, reduces clutter, and adds real value to your home.
Whether you’re doing a full renovation or making targeted upgrades, this guide walks you through seven practical ways to rethink your kitchen’s electrical setup and get more done with less friction.
1. Map Your Workflow Before You Place a Single Outlet

The biggest mistake homeowners make is placing outlets based on where walls happen to fall, not where they actually work. Before any electrician shows up, spend a few days paying attention to how you move around the kitchen. Where do you prep food? Where does the coffee maker live? Which counter space do you use most in the morning versus the evening?
Once you have a clear picture of your daily habits, you can position outlets to match them. For example, if you always blend smoothies at the far end of the counter, that’s exactly where a dedicated outlet should go—not six feet away where you’ll need an extension cord. A kitchen electrical layout built around real habits is always more functional than one built around guesswork.
2. Separate High-Draw Appliances Onto Dedicated Circuits
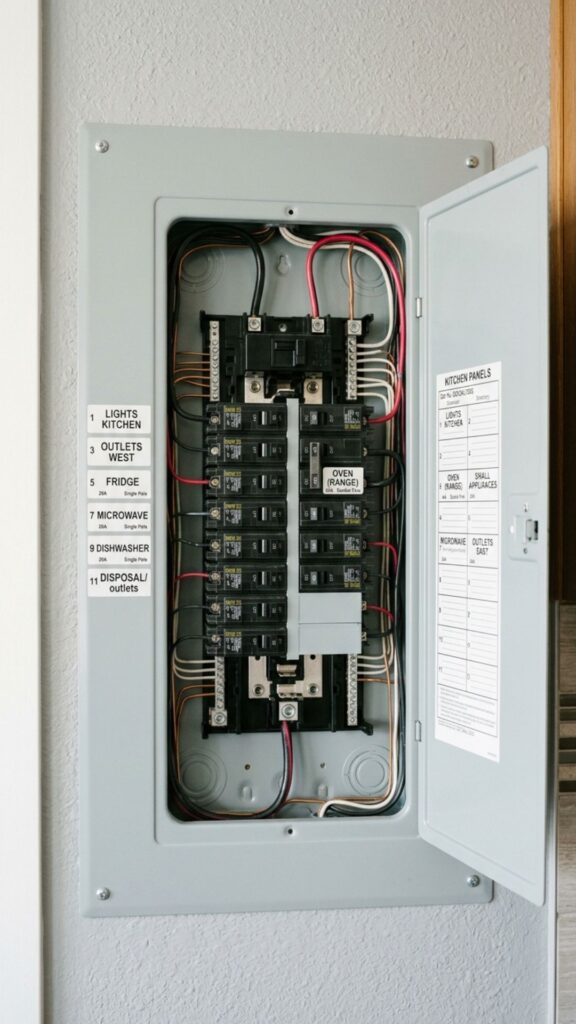
Refrigerators, microwaves, dishwashers, and built-in ovens each draw significant amounts of power. When they share a circuit with smaller appliances, you’re setting yourself up for tripped breakers and potential overloads. The National Electrical Code (NEC) recommends—and in many cases requires—dedicated circuits for these major appliances.
A dedicated circuit means one appliance gets its own breaker in the panel with no other devices competing for that power. Practically speaking, this means your microwave running at full power won’t knock out the outlets on your kitchen island. It also makes troubleshooting easier: if one circuit trips, you know exactly which appliance caused it. When planning your kitchen electrical layout, listing out all high-draw appliances early gives your electrician the information needed to size circuits correctly from the start.
3. Follow the Two-Circuit Rule for Counter Outlets

The NEC requires at least two small-appliance circuits for kitchen counters, each rated at 20 amps. This rule exists because countertops are where most of the electrical action happens—toasters, coffee makers, air fryers, electric kettles, and more all compete for the same space. Two circuits mean you can run multiple appliances simultaneously without overloading a single line.
In practice, smart placement matters as much as the number of circuits. Divide the circuits so each side of the kitchen has access to both. A good approach is to alternate which outlets belong to which circuit along the same counter run. That way, you can plug in a toaster and an electric griddle side by side without worrying about drawing too much current from one line. This small planning detail makes a noticeable difference in how smoothly a busy morning kitchen actually runs.
Why 20-Amp Circuits Matter for Small Appliances
Standard household circuits are 15 amps, but many kitchen countertop appliances—especially newer ones like high-speed blenders and air fryers—benefit from the additional headroom that a 20-amp circuit provides. Upgrading counter circuits to 20 amps during a remodel costs relatively little but gives you room to grow as appliances get more powerful.
4. Think Vertically: Add Outlets Inside Cabinets and Drawers
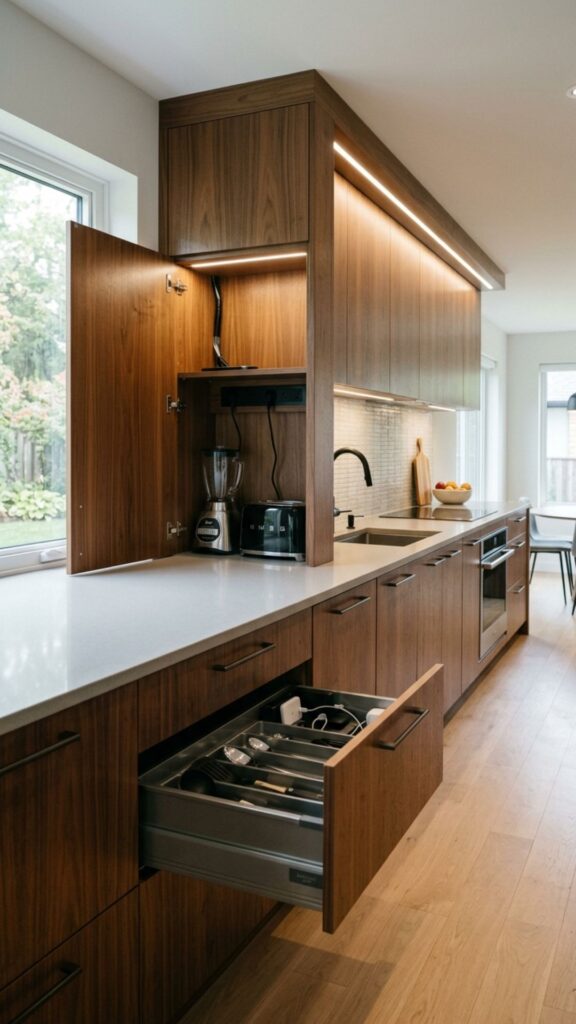
Countertop clutter often comes down to cord management. Charging stations, small appliances, and under-cabinet lighting all need power, and when there are no hidden outlets to plug into, cords end up draped across surfaces. Adding outlets inside upper cabinets or dedicated appliance garages keeps small appliances accessible but hidden—and the counter stays clear.
Drawer outlets are another underused option. An outlet installed inside a deep drawer lets you charge devices, store a small appliance, or keep a knife sharpener plugged in without it taking up any counter space. This approach has become increasingly popular in kitchen design, and it’s a practical upgrade that works well in both new builds and renovation projects. A thoughtful kitchen electrical layout plans for vertical space, not just horizontal wall runs.
5. Place Outlets at the Right Height for How You Actually Cook
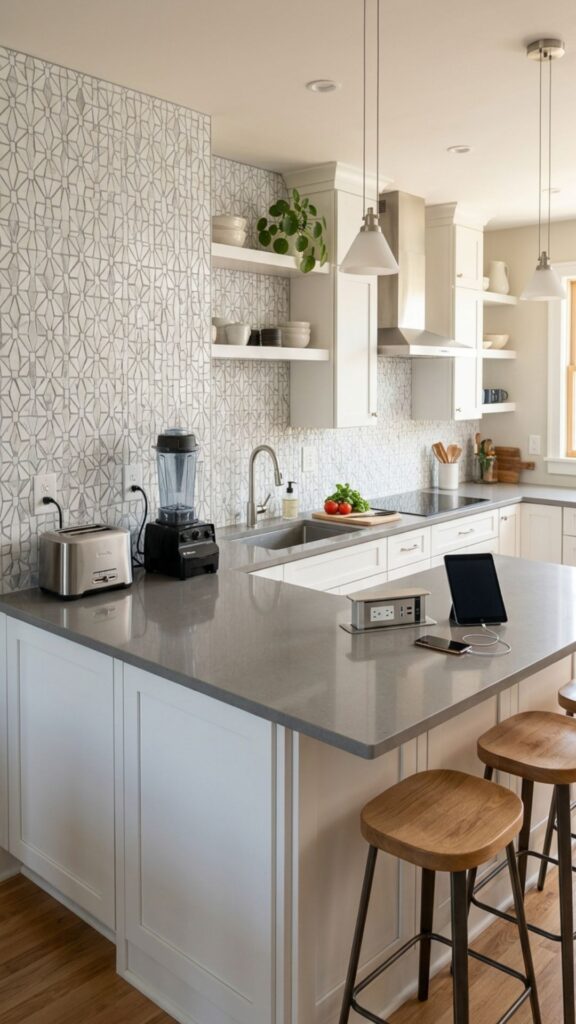
Standard outlet height is about 18 inches above the floor, but in kitchens, outlets are typically installed 4 inches above the backsplash. That positioning isn’t always ideal. If you use a stand mixer that sits 14 inches tall, a cord running up from an outlet behind it creates tension and wear on the cord over time. Adjusting outlet height to sit above the backsplash line, or adding pop-up outlets flush with the countertop, solves this cleanly.
Pop-up and retractable outlets deserve special mention here. These install directly into the countertop surface and rise when needed, then retract out of sight. They’re particularly useful on kitchen islands where mounting outlets on a vertical face can be awkward. The key consideration is making sure they’re rated for countertop installation and meet local code requirements—a detail your electrician will handle, but one worth asking about when planning your layout.
Island and Peninsula Outlet Planning
Islands and peninsulas create their own electrical challenges. Code requires outlets on islands and peninsulas longer than 24 inches, but placement matters. Outlets installed on the side of an island facing away from the cook are practically useless during prep. Position them on the side you face while working, and consider adding one on each side if the island is used from multiple directions.
6. Plan Lighting Circuits Separately from Appliance Circuits

Task lighting—under-cabinet lights, pendant lights over an island, recessed lighting above prep areas—should run on circuits that are separate from your appliance circuits. This isn’t just about capacity; it’s about practicality. If an appliance trips its circuit breaker, you don’t want the kitchen to go dark at the same time. Keeping lighting on its own dedicated circuit means your workspace stays lit no matter what else is happening electrically.
Under-cabinet LED lighting, in particular, has become a standard feature in functional kitchens. It eliminates shadows on cutting boards and prep surfaces, which is both safer and more comfortable during extended cooking sessions. When wiring under-cabinet lighting into the kitchen electrical layout during a renovation, hardwiring it is cleaner than relying on plug-in strips—and it removes yet another cord from the countertop equation.
7. Incorporate GFCI Protection Everywhere Within Six Feet of Water
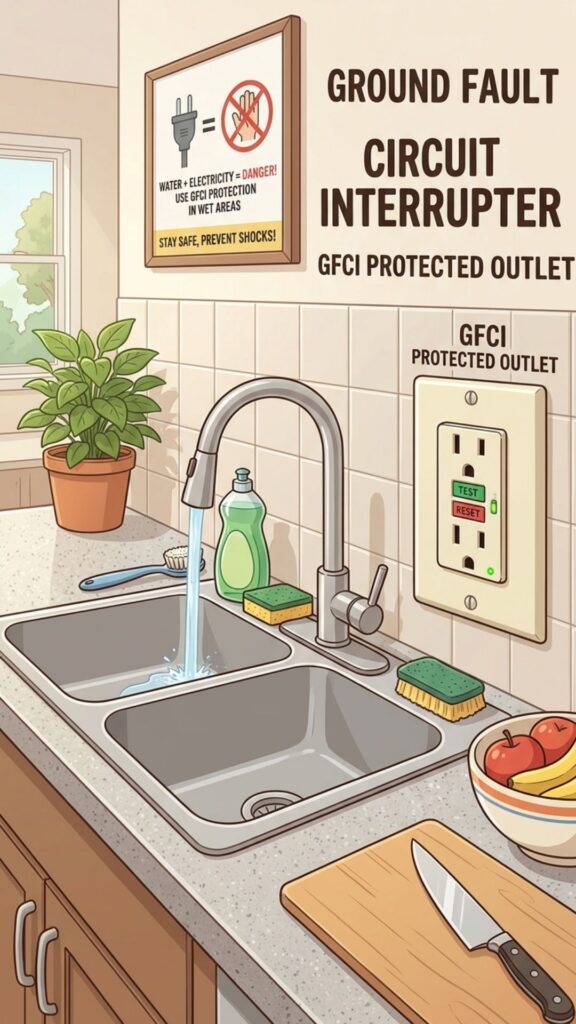
Ground fault circuit interrupter (GFCI) outlets are required by code anywhere an outlet is within six feet of a sink. They cut power in milliseconds if they detect an imbalance in current—the kind of imbalance that happens when electricity is traveling through a person instead of the circuit. In a kitchen, where water and electricity are constantly in close proximity, GFCI protection is non-negotiable.
The practical implication is that most of your kitchen counter outlets will need GFCI protection, either through GFCI outlets themselves or through a GFCI breaker protecting the circuit. During a remodel, installing a GFCI breaker at the panel can protect all outlets on a circuit at once, which is often more cost-effective than replacing each outlet individually. Beyond the code requirement, this is one of the most important safety decisions in any kitchen electrical layout—the protection it provides is real and proven.
Conclusion
A functional kitchen isn’t just about cabinet space and countertop materials. The electrical layout underneath it all determines how smoothly everything runs. By mapping your workflow first, dedicating circuits to high-draw appliances, following the two-circuit rule, hiding outlets inside cabinets, adjusting outlet height, separating lighting circuits, and ensuring proper GFCI protection, you give yourself a kitchen that works the way you actually live.
None of these changes require you to become an electrician yourself—but knowing what to ask for puts you in a much stronger position when working with one. Start by walking through your current kitchen and noting every workaround you’ve built into your daily routine. That list is your renovation roadmap.
Ready to plan a smarter kitchen electrical layout? Talk to a licensed electrician about your specific setup and bring this list of priorities to that first conversation. Small changes in planning can make years of difference in daily function.
How many outlets does a kitchen need?
The NEC requires at least one outlet every four feet along counter space, served by at least two 20-amp small-appliance circuits. Most modern kitchens benefit from more than the minimum—especially if you use several countertop appliances regularly.
Do I need a permit to add kitchen outlets?
In most jurisdictions, yes. Adding or relocating outlets in a kitchen typically requires an electrical permit and inspection. Work done without a permit can create issues when selling your home and may not meet current safety codes. Always check local requirements before starting.
What is the difference between a GFCI outlet and a regular outlet?
A GFCI outlet monitors the flow of electricity and shuts off power within milliseconds if it detects a ground fault—meaning current is flowing where it shouldn’t. Regular outlets don’t have this protection. In kitchens, bathrooms, and outdoor areas, GFCI protection is required by code because of the increased risk of water contact.
Can I add a kitchen island outlet without tearing up the floor?
Sometimes, yes. An electrician can often run conduit through a finished floor or route wiring through a basement or crawl space to reach an island. The feasibility depends on your home’s construction. Wireless charging surfaces are also becoming more common for islands, though they don’t replace code-required outlets—they supplement them.